There is never a shortage of subject matter in nature! These found items represent microcosms of life and activity.
The oak branch and acorn are from a live oak tree (Quercus virginiana) - food and shelter to squirrels, birds, and insects, not to mention support for various lichens and mosses.
The passionvine (Passiflora suberosa) is a native that is continually popping up in my yard; it's a larval food for butterflies in our area such as the Gulf Fritillary and the Julia. I'm pretty sure songbirds eat the berries, and maybe some other critters, too.
Slash pine needles are everywhere on the ground. Each winter the pine trees seem to shed quite a few. I see them turning up in fallen bird's nests, such as this nest I sketched after a pouring rain knocked it down.
I'm not sure if anything eats the necklace pod (Sophora tomentosa) seeds, but I know that bees and butterflies love the nectar from it's bright yellow pea-like flowers.
Lately, it seems that mourning dove feathers are becoming a common occurrence. Are they molting this time of year? Maybe we just have more moving into the area, or perhaps the neighbor cat has been busy.
Fossil shells are fairly common in Florida. This one probably arrived in a load of fill, but it perfectly symbolizes the fact that our part of Florida was once an underwater ecosystem.
I picked these up at first just to draw them as interesting objects in themselves, but somehow the process of drawing and reflection opened up a whole new world. I think I could explore my entire yard and still not fully understand the little worlds within!
You can click on the image above to view it larger on my Flickr photostream.

Thursday, January 28, 2010

Saturday, January 23, 2010
Tips for the Frugal Artist
Today's economy can challenge any artist's creativity and resources - let's face it, art supplies are expensive, especially professional grade materials. The tips below may help!
1. Keep materials and supplies clean and organized. They’ll be in good shape when you’re ready to go plus you’ll be able to easily find just what you want. Knowing what you have means that you’ll be able to use it! Taking care of brushes will extend their life. They should be cleaned well and dried flat; never leave them standing in water or solvents.

4. Trade with another artist. We all have something we bought at one time that we've used seldom or never. Swap supplies with someone else!
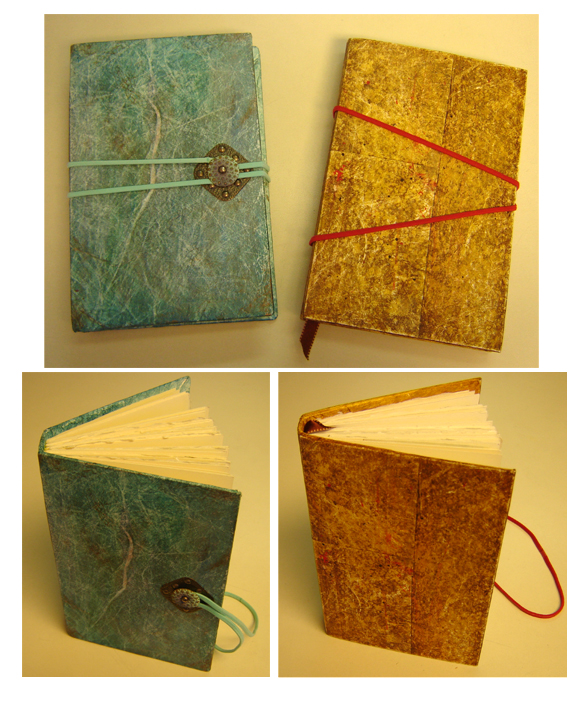
 5. Make your own sketchbooks from leftover paper. There are many online resources ; sketchbooks can be made any size, and from almost anything. I had about 30 pieces of light-weight watercolor spiral bound for less than $2.00 and created a unique and portable sketchbook that was a joy to use. An online resource I came across recently used duct tape instead of stitching or binding. I’ve also hand-sewn bindings, using materials I already had at home (see journals at right). I used carpet thread and an embroidery needle for stitching, leftover beeswax chunks to wax the thread, a butter knife handle as a bone folder, duct tape for book cloth, thin cardboard for the spine, front and back covers, white household glue for the covers, an old Tyvek envelope to cover the outside, ribbon scraps for bookmarks, and leftover colored paper for the end papers.
6. Investigate other art forms. Have you thought about creating small pieces, such as ATC’s (artists trading cards)? Collage is a great way to explore dimension and texture, and lends itself to found materials readily – so do altered art forms. There are hundreds of online resources on altered books and journals, and repurposed clothing and accessories. Consider printmaking techniques such as leaf monotypes, or printing with leaves, gelatin, or fish.
7. Let accidents happen. I learned this one great thing from a fellow artist – if you make a mistake in your journal or sketchbook, don’t throw that page away. Make it into something else or cover it up with a square of paper and continue drawing or painting. Let an accidental splotch or puddle lead you into a new area of exploration, you have nothing to lose! Learning to utilize “happy accidents” loosens us up and expands our vision as well as saving paper.
You can click on each image to view it larger on my Flickr photostream.
1. Keep materials and supplies clean and organized. They’ll be in good shape when you’re ready to go plus you’ll be able to easily find just what you want. Knowing what you have means that you’ll be able to use it! Taking care of brushes will extend their life. They should be cleaned well and dried flat; never leave them standing in water or solvents.
2. Consider alternate materials. Making a mark with a charred stick on a stone can cost nothing; it expands creative boundaries and connects us to our ancestor artists. Besides stones, consider more mainstream surfaces such as paper bags, Tyvek envelopes, plastics, wood, or fabrics. How about chalk, ball point pens, crayons, or berry juice for mark-making? Can you paint with a finger, a feather, or with yarn? Investigate inexpensive supplies from children’s stores and office supply aisles. Does it have to be archival? Let your digital camera or scanner archive the image for you. I love using inexpensive mechanical pencils for sketching. Use the backs of your material, too, if it’s thick enough.
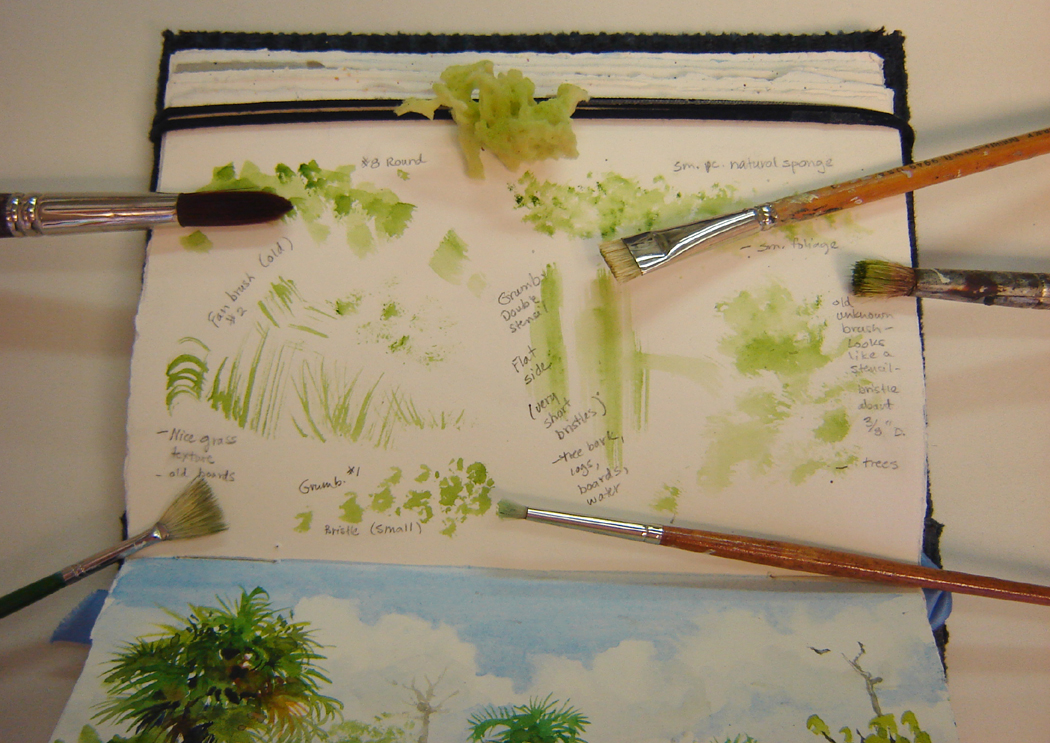
3. Explore materials you already have but seldom use. Start by creating some test swatches on different surfaces. Try out those brushes and sponges you collected but never find yourself choosing. If your materials aren’t acceptable for creating art, what about using them in other creative ways? Can you use that odd shade of orange for stamping, printing, to decorate end papers, or as a base for something else? Can you mix it with another color to make it more viable?
4. Trade with another artist. We all have something we bought at one time that we've used seldom or never. Swap supplies with someone else!
 5. Make your own sketchbooks from leftover paper. There are many online resources ; sketchbooks can be made any size, and from almost anything. I had about 30 pieces of light-weight watercolor spiral bound for less than $2.00 and created a unique and portable sketchbook that was a joy to use. An online resource I came across recently used duct tape instead of stitching or binding. I’ve also hand-sewn bindings, using materials I already had at home (see journals at right). I used carpet thread and an embroidery needle for stitching, leftover beeswax chunks to wax the thread, a butter knife handle as a bone folder, duct tape for book cloth, thin cardboard for the spine, front and back covers, white household glue for the covers, an old Tyvek envelope to cover the outside, ribbon scraps for bookmarks, and leftover colored paper for the end papers.
6. Investigate other art forms. Have you thought about creating small pieces, such as ATC’s (artists trading cards)? Collage is a great way to explore dimension and texture, and lends itself to found materials readily – so do altered art forms. There are hundreds of online resources on altered books and journals, and repurposed clothing and accessories. Consider printmaking techniques such as leaf monotypes, or printing with leaves, gelatin, or fish.
7. Let accidents happen. I learned this one great thing from a fellow artist – if you make a mistake in your journal or sketchbook, don’t throw that page away. Make it into something else or cover it up with a square of paper and continue drawing or painting. Let an accidental splotch or puddle lead you into a new area of exploration, you have nothing to lose! Learning to utilize “happy accidents” loosens us up and expands our vision as well as saving paper.
You can click on each image to view it larger on my Flickr photostream.
Tuesday, January 19, 2010
Red maple

Since we're in Florida near the western coastline and the Gulf of Mexico, we don't often have to scrape the ice from our windshields before work! Last week we had three frosty mornings, with temperatures dipping just below the freezing point.
The freezing temperatures presented us with an array of dying leaves, some changing colors in magnificent ways. I'm glad I got to take a photo of this wonderful red maple and finish my sketch; today the tree has dropped nearly all of its leaves.
I wish I could share the colors of the leaves with you - at best this is an approximation. The dying maple leaves are even more glorious than the new foliage, which is sometimes a combination of red, purple, and bronze.
Other trees in the area are sporting browns and yellows; the cypresses are my next favorite, its needles turning from green to a golden rusty brown. In the meantime, our temperatures have warmed up considerably!
You can click on the image above to view it larger on my Flickr photostream.
Sunday, January 17, 2010
Beach sunflowers - practice and color samples
I've mentioned before that I've been using an Aquabee sketchbook, and recently I did some media comparisons using the same subject: beach sunflowers.
 What inspired me to start some quick studies of a single flower was a book I got as a gift - "The Flower Painter's Pocket Palette," by Elisabeth Harden. It's a small book and describes itself as an "...instant visual reference on colors and shapes." I would recommend it for the beginner or as a quick reference for anyone. The book has several examples of how to paint different colors and shapes of flowers, showing examples of a 2 or 3 step painting process. If you are interested in the book, you can take a look at it here.


 What inspired me to start some quick studies of a single flower was a book I got as a gift - "The Flower Painter's Pocket Palette," by Elisabeth Harden. It's a small book and describes itself as an "...instant visual reference on colors and shapes." I would recommend it for the beginner or as a quick reference for anyone. The book has several examples of how to paint different colors and shapes of flowers, showing examples of a 2 or 3 step painting process. If you are interested in the book, you can take a look at it here.
Anyway, I decided to test out my various yellows, as a comparison, and also to see how well they worked on the Aquabee paper (see sketchbook page above). The sketchbook features heavyweight drawing paper for both wet and dry media. It does have a slightly textured surface, and withstands light washes well. I did have some buckling with heavier washes. The white paper is bright, but not overly so. It isn't sized like watercolor paper, so there isn't a lot of nice flow and mingling of color, like a good cold-press watercolor surface. The color stays brilliant, though.
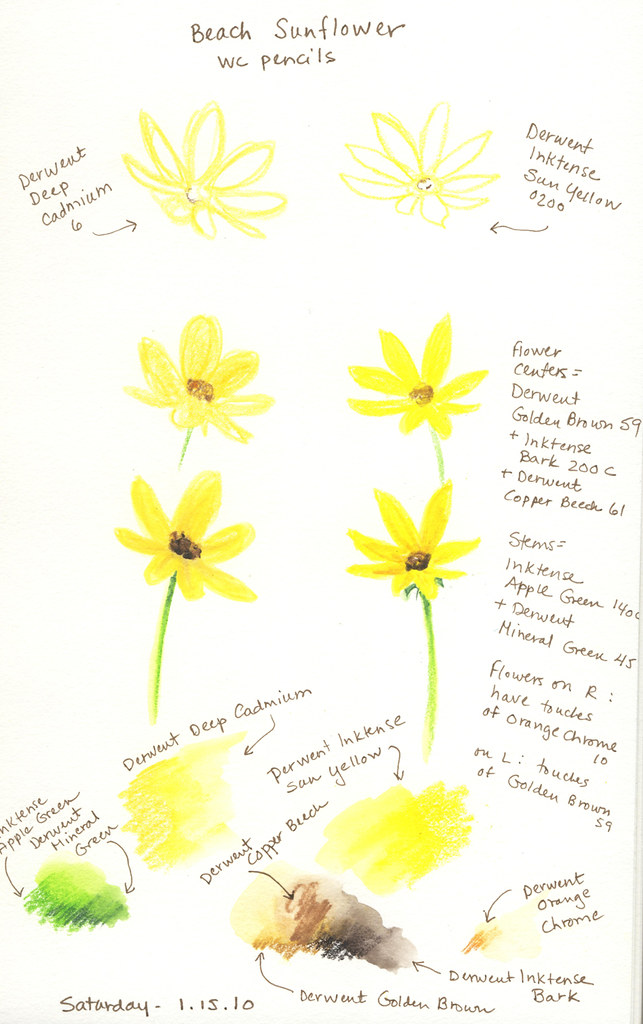
Next, I thought I'd try out my water-soluble pencils: a combination of Derwent regular and Inktense (the next sketchbook page). I did a 3-step example so I could remember the process in the future. Once again, the colors didn't flow as well together as I would have liked, but the tooth made for some nice pigment textures!
I learned a lot form these simple exercises.
- I need to practice more with watercolor washes to get the hang of the different paper.
- My yellows are quite different looking when I compare them side-by side.
- This paper seems to do well when I work in layers, letting each one dry well between painting or drawing.
- I also learned a bit about how other artists use color mixes in their flower painting.
- And I learned about a new color: brown-pink, which actually looks like a yellowed medium to light brown. That started me off on a whole new tangent investigating organic pigments...but that's for another day!
Sunday, January 3, 2010
Live oak leaves

Just when you've learned to recognize leaf shapes and get to know a tree, you come across one that likes variety. I'm used to live oak leaves that look (mostly) like the center leaf in my drawing.
Imagine my surprise to find these other shapes in the leaf litter below the tree. I checked the branches above to see if others on this tree were this variable, and yes, they were! Solid evidence for using more than one field guide for identification.

I drew this fairly quickly with my new Sakura Pigma Sepia pens, and laid in a few watercolor washes to reflect the color differences. I have a few of the Sakura black ink pens, but brown or sepia ink just seems a little friendlier for some subjects.
The pens work well in the Aquabee sketchbook I've been using, and the set has a nice variety of weights and tips. The color scans just a wee bit cooler in color (at least on my monitor); on the page they seem a bit warmer in hue.
You can click on the topmost image to view it larger on my Flickr photostream. Thank you for visiting!
Subscribe to:
Posts (Atom)